Showing posts with label webfaction. Show all posts

Wednesday, January 4, 2017

Limit celery concurrency workers to limit memory usage

Limit the number of concurrent workers for celery message processing.

We are using sentry for error logging and monitoring, and recently my sentry server moved from one shared server to another and with that it started crashing because of memory usage way over limit (shared server has limit of 1024MB and my celery worker was taking 2759MB).

When I saw the log, I was surprised looking at number of worker processes -

user - 66MB - 0:06:45 - 21356 - [celeryd: celery@ servername:Worker:MainProcess] -active- (celery worker -B)
user - 68MB - 0:06:41 - 21657 - gunicorn: worker [Sentry]
user - 69MB - 0:06:40 - 21658 - gunicorn: worker [Sentry]
user - 61MB - 0:06:40 - 21659 - [celery beat]
user - 61MB - 0:06:40 - 21660 - [celeryd: celery@servername:Worker-2]
user - 61MB - 0:06:40 - 21661 - [celeryd: celery@servername:Worker-3]
user - 61MB - 0:06:40 - 21662 - [celeryd: celery@servername:Worker-4]
user - 61MB - 0:06:40 - 21663 - [celeryd: celery@servername:Worker-5]
user - 61MB - 0:06:40 - 21664 - [celeryd: celery@servername:Worker-6]
user - 59MB - 0:06:40 - 21665 - [celeryd: celery@servername:Worker-7]
user - 59MB - 0:06:40 - 21666 - [celeryd: celery@servername:Worker-8]
user - 61MB - 0:06:40 - 21667 - [celeryd: celery@servername:Worker-9]
user - 59MB - 0:06:40 - 21668 - [celeryd: celery@servername:Worker-10]
user - 61MB - 0:06:40 - 21669 - [celeryd: celery@servername:Worker-11]
user - 61MB - 0:06:40 - 21670 - [celeryd: celery@servername:Worker-12]
user - 59MB - 0:06:40 - 21671 - [celeryd: celery@servername:Worker-13]
user - 61MB - 0:06:40 - 21672 - [celeryd: celery@servername:Worker-14]
user - 59MB - 0:06:40 - 21673 - [celeryd: celery@servername:Worker-15]
user - 59MB - 0:06:40 - 21675 - [celeryd: celery@servername:Worker-16]
user - 61MB - 0:06:40 - 21677 - [celeryd: celery@servername:Worker-17]
user - 61MB - 0:06:40 - 21678 - [celeryd: celery@servername:Worker-18]
.....
user - 61MB - 0:06:40 - 21678 - [celeryd: celery@servername:Worker-44]


Looking at above, obviously it was going to kill the process as the usage was going much higher than allowed.

It was happening because of default concurrent process setting for celery. As per the documentation -

-c--concurrency
Number of child processes processing the queue. The default is the number of CPUs available on your system.

In this case probably the number of CPU of the server was much higher. So the solution was to set the restriction by providing concurrency you want. 


> celery worker -B --concurrency=4

It resolves the issue. You can validate number of celery process by - 

> ps -ef | grep celeryd

Hope it helps!

Saturday, December 17, 2016

RabbitMQ monitoring on New Relic - Webfaction

We are using celery with Django for some time now, and it uses RabbitMQ for the messaging backend. Sometimes post server updates, RabbitMQ goes down or due to heavy message load it slows down, in those cases currently we don't have any visibility. In order to monitor the queue, and get the the notification/alert in case of any alarming situation, we have setup monitoring on New Relic. Here are the steps -

There are various choice for RabbitMQ monitoring on New Relic, but we used this one.

On your server run following command - 

1> pip install newrelic-plugin-agent

If it’s dedicated server and you have full access, get configuration file /opt/newrelic-plugin-agent/newrelic-plugin-agent.cfg to /etc/newrelic/newrelic-plugin-agent.cfg and edit the configuration in that file. In my case its shared webfaction server, so we installed on /home/username/newrelic/ folder. (we created newrelic folder on the home).

2> Once create the newrelic folder, copy this sample config file there.

Update the license key, user under Daemon (who has access to run the process, also make sure you give proper access to that user to the newrelic folder)

3> Update the settings for rabbitmq

 rabbitmq:
   name: PROD-RABBITMQ
   host: localhost
   port: 15672
   verify_ssl_cert: false
   username:
   password:
vhosts:
:
queues: []

In above vhosts is optional, if you have simple setup and not that many hosts and queues, you can skip that and it will monitor all.

4> To run in debug mode for testing -
newrelic-plugin-agent -c newrelic-plugin-agent.cfg -f

Once you see that your setup is running fine, start it in background mode by removing -f
newrelic-plugin-agent -c newrelic-plugin-agent.cfg
Notes -

It needs few things in order to this api calls to work for monitoring (Enable http UI for rabbitmq using rabbitmq_plugins)

> rabbitmq-plugins enable rabbitmq_management

Without enabling HTTP UI, it won’t be able to allow api access to monitoring service.

> once its enabled, you can try curl calls on /api on port 15672

Issues -

Getting nothing reported to newrelic

Reason -
curl -i -u username:password http://localhost:15672/api/vhosts
HTTP/1.1 401 Unauthorized
Server: MochiWeb/1.1 WebMachine/1.10.0 (never breaks eye contact)
Date: Fri, 16 Dec 2016 16:56:44 GMT
Content-Length: 57

{"error":"not_authorised","reason":"Not management user"}

Solution -
I had to create another user specifically for the monitoring, with administrator tag and proper permissioning as per the RabbitMQ documentation

Friday, January 8, 2016

Redis server installation on webfaction/ on shared server

I come across redis while using sentry. With the latest version 7.7.4, you need redis to run sentry.

Here are the steps to install Redis server on shared server of webfaction -

First fetch redis installation on home directory (of your account)
$ wget "http://download.redis.io/releases/redis-3.0.6.tar.gz"

Extract it and remove the version name from the directory.
$ tar -xzf redis-3.0.6.tar.gz
$ mv redis-3.0.6 redis
(to keep it clean remove the redis-3.0.6.tar.gz)

Run installation
$ make
Run test to verify that installation was correct
$ make test
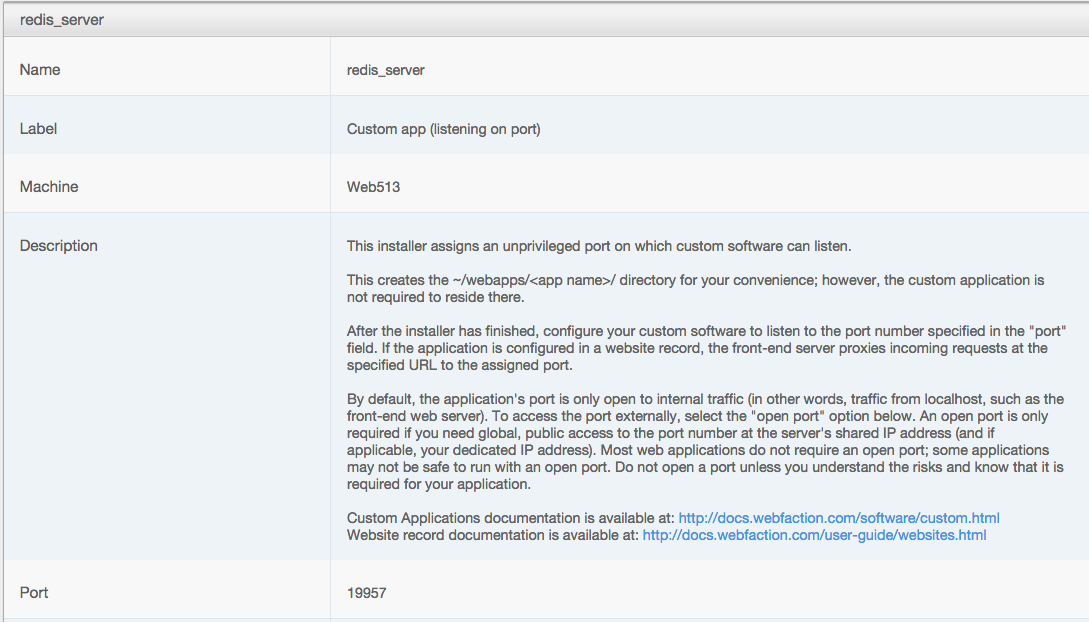
Now go to webfaction and create custom app, so that we can get port number and we can use it at various places on the configuration.

It will get you the new port information and creates the directory based on the name you have given inside the webapps directory in your account.

As per above, your app name is redis_server and custom port for it - 19957

Now copy redis.conf from extraction to the webapps.

$ cd ~/webapps/redis_server/
$ cp ~/redis/src/redis-server .
$ cp ~/redis/src/redis-cli .
$ cp ~/redis/redis.conf .
Update three items in the redis.conf file.

daemonize no > daemonize yes
pidfile /var/run/redis.pid > pidfile /home//webapps/redis_server/redis.pid
port 6379 -> port 19957
Now try to run it manually to verify once. (ideally we want to run it in background)
./redis-server redis.conf

Once it’s running, you can test if its running fine or now by going to cli
./redis-cli -p 19957

It should prompt -
127.0.0.1:19957>

Otherwise it will say-
not connected >

you can get out of the cli mode by Ctl + d

You can automate this commands by creating Makefile

vi Makefile
client cli:
       ./redis-cli -p 19957
start restart:
       ./redis-server redis.conf
stop:
       cat redis.pid | xargs kill

In order to start now, you can use
make start

to stop
make stop

you can manually search and find the redis process
ps -u $USER -o pid,command | grep redis

and kill it manually

Would still prefer the clean way of

Tuesday, June 17, 2014

Setup New Relic with Webfaction Django App (Python setup)


New Relic is awesome Application Performance management tool. You can setup your application's health check in few easy steps -

Create a free account with New Relic. Here, below are the steps to setup your app's performance management on New Relic Dashboard :

- Get the licence key from newrelic


- install package on your server - pip install newrelic


- generate config file - newrelic-admin generate-config newrelic.ini
(It should generate newrelic.ini file)


- Add following lines in to .wsgi file (provide the full path of the newrelic.ini)
import newrelic.agent
newrelic.agent.initialize('/path/newrelic.ini')

- Restart the application

Within few minutes the you should be able to see the dashboard with different metrics. Also setup the web url of your application for the ping checker. In case of any issue with it, you will get real time notification. 


There are other tools like DataDog also used by so many companies. Both allows setup of different hosts and apps health check setup. I am also planning to setup celery and solr in new relic dashboard. I'll add setup steps for those as and when its done.

Monday, March 10, 2014

Update Django on Webfaction

We are using webfaction for our Django Application, and its been really awesome service for the Django apps. Most of the things are configurable from their support dashboard.

Now you get to choose the Django and python version when you setup your application first time. However, later if you want to upgrade to newer version of the Django as it made available by Django community, you can follow below steps. In this example my current version of Django is 1.4.1 and I am going for Django 1.4.5.

Please note, following steps are just to update the Django version, if there are functional, API, Model query, settings or any other changes required inside your application, you will need to refer to Django official documentation or migration guide provided on the Django.

Here are the steps to upgrade Django in Webfaction -

1. Go to your App directory. 
> $HOME/webapps/

2. Get the version you want. (here we are extracting 1.4.5)
> wget https://www.djangoproject.com/download/1.4.5/tarball/

3. Extract.
> tar -zxvf Django-1.4.5.tar.gz

4. Rename the existing one. (existing django to django.old)
> mv lib/python2.7/django lib/python2.7/django.old

5. move the new one to lib (now as we have renamed, we can move the content from new django package to lib/python 2.7)
> cp -R Django-1.4.5/django lib/python2.7

6. move the management scripts (copy management script for wsgi, and app creation etc.)
> cp Django-1.4.5/django/bin/* bin
7. Restart and make sure it runs fine.
> apache2/bin/restart

8. delete the extract and tar (only after checking that it works fine, you can remove the floating folder and file from the directory.)
> rm -rf Django-1.4.5*

And that should do the trick! Feel free to drop message or email if you run into any issue.

Thanks.